Fungible Tokens are the basis of currency on the Solana blockchain, where each and every token has a unique value. This blog illustrates how you can create,mint and airdrop custom SPL tokens on Solana.

Solana is a programmable, open-source blockchain known for speed and scalability. There are two types of tokens on Solana Blockchain: Fungible Tokens, or FTs, and Non-fungible Tokens, or NFTs. In a blockchain, Non-fungible tokens are data units representing a unique digital asset stored and verified on the blockchain, whereas fungible tokens are cryptocurrencies like Bitcoin. A good example of an SPL token can be SOL, which is the native currency of Solana.
In this blog, we will see how we can create, mint and airdrop tokens our own custom tokens (coins) on the Solana blockchain using SHYFT APIs.
Read SHYFT API Documentation here.
Before getting started
To get started, we will need a few things.
Phantom Wallet
We will need the Phantom wallet browser extension, you can download it from the link below.
Once done, set up your Phantom wallet account. On-screen tips are available, which will guide you through setting up and getting started. You can also find a detailed guide related to this here.
Authentication: Getting your Shyft API key
x-api-key is an authentication parameter, which gives you access to SHYFT APIs. You can get your own API Key from the SHYFT website. Just signup with your email id here and you can get it for free.
The details of the token to be created
First, we have to collect the data related to the coin(token) we are about to create. To collect the data from the user, we have created a form using React, but you can use any other method according to your requirement.
Press enter or click to view image in full size
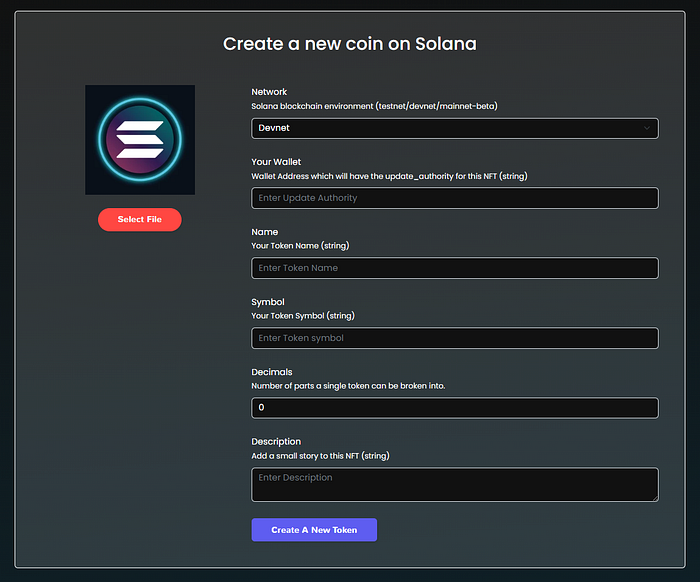
Form for collecting data for creating a token.
As soon as we have all the information for creating a token, we can go on and make a SHYFT API call required to create a token.
The API endpoint and the request
SHYFT provides a collection of APIs for almost all operations on Solana Blockchain, which include NFTs, Fungible Tokens, Wallets, Semi-custodial wallets, Marketplace, and Storage. You can check out SHYFT’s API Docs here.
For creating a token, we will use SHYFT’s very own create_detach token API. The API endpoint is as follows:
POST https:This API accepts x-api-key parameter in the header, which is an authorization parameter used by SHYFT for validating its users. You can get your own **x-api-key** from the SHYFT website for free here. The Content-Type for this API call is multipart/form-data.
Parameters used for this API call:
network: Selects the Solana network cluster, which can be eitherdevnet,testnetormainnet-beta.wallet: Accepts the Wallet address that will have the update authority of the token being created.name: Accepts the name of the token.symbol: Accepts the symbol of the NFT being created.decimals: Number of parts the Token can be split into. Accepts a number. This is an optional parameter and its default value is 9.description: Accepts a short description of the Token being created.file: Accepts the image of the token being created.
For details on SHYFT APIs and parameters, click here, or you can also try our APIs on swagger UI.
Get Team Shyft’s stories in your inbox
Join Medium for free to get updates from this writer.
Once the API request is successfully executed, we should have a response somewhat like this.
{ "success": true, "message": "Token create request generated successfully", "result": { "encoded_transaction": "AQAAAAAAAAAAAAAAAAAAAAAAAAAAAAAAAAAAAAAAAAAAAAAAAAAAAAAAAAAAAAAAAAAAAAAAAAAAAAAAAAAAAAABAAEDGMqfUcVHHu2+lyU5gx9wU2rGxk2NoSXtodMSdev+DxU149+BuHwrHyERE4lK+pDqz1cPOaPnPAO56DKHpPnPqQtwZbHj0XxFOJ1Sf2sEw81YuGxzGqD9tUm20bwD+ClGZ75+gzsF6WPLOQgC+tL75bEdK/l5cBP0MXH6KxOmXycBAgIBALwBDwEEAAAASG9sYQIAAABITFgAAABodHRwczovL25mdHN0b3JhZ2UubGluay9pcGZzL2JhZmtyZWlod2Vxd3lkd29iaG9yM2FzZjd1YWFocm5tc3c2cDdnNnh5cnl6a2p4dTJuM2ZrZ2d6dnd5BQABAQAAABjKn1HFRx7tvpclOYMfcFNqxsZNjaEl7aHTEnXr/g8VAWQAAAEYyp9RxUce7b6XJTmDH3BTasbGTY2hJe2h0xJ16/4PFQEAAQE=", "mint": "EAmTA4TiEPShWKgy3G1iYyco3suogTocZVVbAwqjoPKV" }}This **encoded_transaction** received in the response of the API call needs to be signed by the end user, in order to be successfully executed by the Solana Runtime. Now, let’s see how we can do that.
Signing the Transaction
The encoded_transaction received in the previous step needs a signature from the update_authority **wallet** in order to be successfully executed. We use the following function to sign the transaction from the user’s wallet via popup.
export async function confirmTransactionFromFrontend(connection, encodedTransaction, wallet) { console.log(encodedTransaction); const recoveredTransaction = Transaction.from( Buffer.from(encodedTransaction, 'base64') ); const signedTx = await wallet.signTransaction(recoveredTransaction); const confirmTransaction = await connection.sendRawTransaction( signedTx.serialize() ); return confirmTransaction;}This function accepts the connection object, the encoded_transaction, and the wallet object as its parameters. To learn more about getting the connection and the wallet object, or to know more about signing transactions on Solana, read our dev guide here. You can also find all the functions related to signing transactions here.
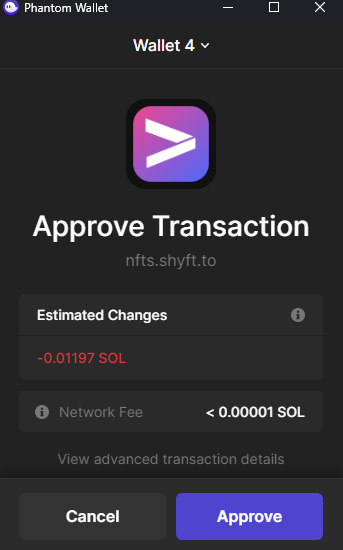
Signing a transaction from user wallet using popup
Once the transaction has been signed successfully, the Coin (token) will be created, Now time to mint more units of the token just created and airdrop them to any wallet, including your own.
Read SHYFT API Documentation here.
Minting and Airdropping Tokens to a wallet
Once the Token has been created, we are ready to mint more units of the token and airdrop them to a specific wallet. SHYFT also has an API for this function as well.
POST https:This API accepts x-api-key parameter in the header, which is an authorization parameter used by SHYFT for validating its users. You can get your own **x-api-key** from the SHYFT website for free here.
Parameters used for this API call.
network: Selects the Solana network cluster, which can be eitherdevnet,testnetormainnet-beta.wallet: Accepts the Wallet address that has the update authority of the token being airdropped.receiver: Accepts the wallet address of the token receiver.token_address: Address of the token that is being minted. In our case that is the token that was just created in the previous part of this blog.amount: Amount of tokens to be airdropped. This has to be a number.message: This is an optional field, that adds a message for the user.
Once successfully executed, this also returns an encoded_transaction which needs a signature from the authority_wallet to be executed successfully.
{ "success": true, "message": "Token mint request generated successfully", "result": { "encoded_transaction": "AQAAAAAAAAAAAAAAAAAAAAAAAAAAAAAAAAAAAAAAAAAAAAAAAAAAAAAAAAAAAAAAAAAAAAAAAAAAAAAAAAAAAAABAAEDGMqfUcVHHu2+lyU5gx9wU2rGxk2NoSXtodMSdev+DxU149+BuHwrHyERE4lK+pDqz1cPOaPnPAO56DKHpPnPqQtwZbHj0XxFOJ1Sf2sEw81YuGxzGqD9tUm20bwD+ClGZ75+gzsF6WPLOQgC+tL75bEdK/l5cBP0MXH6KxOmXycBAgIBALwBDwEEAAAASG9sYQIAAABITFgAAABodHRwczovL25mdHN0b3JhZ2UubGluay9pcGZzL2JhZmtyZWlod2Vxd3lkd29iaG9yM2FzZjd1YWFocm5tc3c2cDdnNnh5cnl6a2p4dTJuM2ZrZ2d6dnd5BQABAQAAABjKn1HFRx7tvpclOYMfcFNqxsZNjaEl7aHTEnXr/g8VAWQAAAEYyp9RxUce7b6XJTmDH3BTasbGTY2hJe2h0xJ16/4PFQEAAQE=", "mint": "EAmTA4TiEPShWKgy3G1iYyco3suogTocZVVbAwqjoPKV" }}You can know more about signing transactions on Solana from our dev guide here. You can also find all the functions related to signing transactions here.
Once executed successfully, the token will be minted and airdropped to the receiver wallet.
Press enter or click to view image in full size
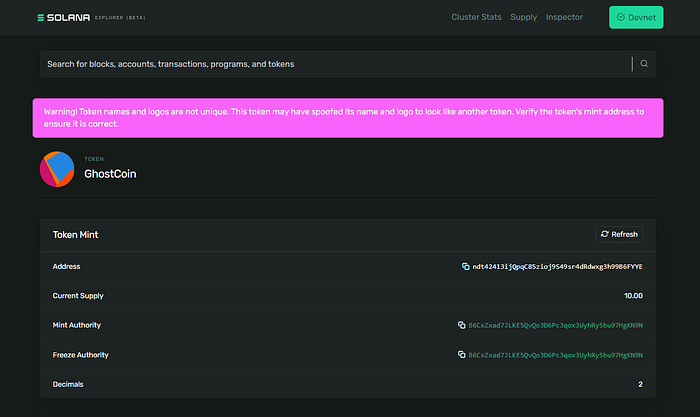
Newly created custom token on Solana
So that’s pretty much everything about creating, minting and airdropping tokens on Solana using SHYFT APIs. If you liked this tutorial, feel free to follow along with our other tutorials on creating gasless listings on an NFT Marketplace or adding NFTs to collections on Solana. We hope you have a great time building dApps on Solana using SHYFT APIs.
If you want to follow along with this tutorial, you can find all the files related to this tutorial here. You can also try out the extended version of this project with added features here.
Resources
Join our Discord