Now, let’s see how we can start a new membership for a user in our marketplace, based on NFTs.
In the previous part of this tutorial series, we have seen how we can verify the membership to a marketplace based on NFTs using SHYFT APIs. Now, let’s see how we can start a new membership for a user in our marketplace, based on NFTs. So let’s get started.
We are maintaining the membership details for our marketplace using NFTs and NFT metadata. Now, if a new user wants to start a membership to our marketplace, we have to provide the user with a new membership NFT in their crypto-wallet, also we have to deduct a certain amount from their wallet as charges for the membership service. We can implement the above scenario using SHYFT APIs.
Creating a new membership NFT in the user’s crypto wallet using SHYFT APIs.
Our marketplace offers 3 types of memberships for its users, namely Green-tier, Blue-tier and Red-tier.
Press enter or click to view image in full size
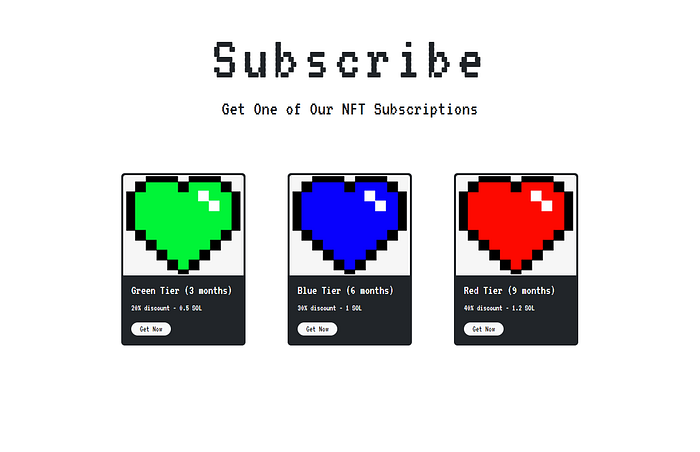
Subscription provided by the NFT Marketplace
Now suppose the user wishes to get a green-tier membership, which provides a 20% discount on products and has a 3 months validity, in exchange of 0.5 SOL. So, we would have to create a membership NFT with the following details in the NFT metadata to the user’s crypto-wallet. Also, we would have to deduct the membership charges from the user’s crypto wallet and transfer it to the marketplace owner wallet. Let’s see how we can do that using SHYFT APIs.
API used for creating an NFT
POST https://api.shyft.to/sol/v2/nft/createThis API accepts x-api-key parameter in it’s header and the Content-Type for this API call is multipart\\form-data. x-api-key is an authorization parameter used by SHYFT for validating its user. You can get your own x-api-key from the SHYFT website for free here.
Get Team Shyft’s stories in your inbox
Join Medium for free to get updates from this writer.
Details of the parameters to be supplied:
network: Selects the Solana Blockchain network instance.creator_wallet: Selects the wallet which will have theupdate_authorityof the NFT being created. In our case this will be the wallet address of the marketplace owner.name: name of the NFT being created. In our case we can name it after the type of membership we are providing, for example, green-tier or blue-tier.symbol: symbol of the NFT that is being created.description: a small description about the NFT.attributes: This accepts the NFT metadata in a specified format. We use this field to keep track of the NFT membership to our store.
{
 trait_type: "name",
 value: "Green",
},
{
 trait_type: "discount",
 value: "20",
},
{
 trait_type: "start_date",
 value: MEMBERSHIP_START_DATE,
},
{
 trait_type: "exp_date",
 value: MEMBERSHIP_END_DATE,
}max_supply: Number of edition NFTs that can be minted for this particular NFT. In our case this will be 0, as we want to create one-of-a-kind NFTs.file: Selects the NFT image.service_charge: Specifies the receiver and the amount which will be deducted as a service charge. In our case, this will be the marketplace owner’s wallet address , and the amount will be the amount (in SOL) we are charging for the membership service.
{
 "receiver": WALLET_ADDR_OF_MARKETPLACE_OWNER,
 "amount": 0.5 //for green-tier membership, can be different for other tiers.
}fee_payer: Specifies the wallet address from which the service_charge will be deducted. In our case, this will be the user’s wallet address.
Once this request is successfully executed, the response should look somewhat like this.
{
  "success": true,
  "message": "NFT create request generated successfully",
  "result": {
    "encoded_transaction": "AgAAAAAAAAAAAAAAAAAAAAAAAAAAAAAAAAAAAAAAAAAAAAAAAAAAAAAAAAAAAAAAAAAAAAAAAAAAAAAAADd/kZ7nuc7bHY1UZVoVPsZ2Slp+9Sz9dwdHYG7/EP0XTgUn5L1oPWrbCiWyhASqoz4vROwbl2Neo1exHuYvnYIAgAID0mioYxx/asdasdsSls7U3Uq1cPiWEWioadmJJkpfEpJj1IRPDYHVKLFdzmKAhEV5ABsw3PbAIcv3yNkm3z5V2dA0oNsKtkdrxCZh81eIaZc6sHtpoVRDXqCwk2sxG3tUhDS4Opo80GCvyIr4gr+MfwhU03cnO9eEM/I2BvSTn8atGSgv4jEnlxkrsXIO3WpLa65+YPE+hVbcdZfoTSlkuSZace5SwBw7BnI9z9u9hPXYCyNkAAWPPPEqUQJe24xjrsbmyqqUL4gQg6etSyylLP4PMcsG5bcYK4xg9sKxkzNEVAAAAAAAAAAAAAAAAAAAAAAAAAAAAAAAAAAAAAAAAAAAYyp9RxUce7b6XJTmDH3BTasbGTY2hJe2h0xJ16/4PFYyXJY9OJInxuz0QKRSODYMLWhOZ2v8QhASOe9jb6fhZzgOeiS4FIAsM7m2Xp1OR42r2qbdt9WblPm7k6dy0XkQLcGWx49F8RTidUn9rBMPNWLhscxqg/bVJttG8A/gpRgan1RcZLFxRIYzJTD1K8X9Y2u4Im6H9ROPb2YoAAAAABt324ddloZPZy+FGzut5rBy0he1fWzeROoz1hX7/AKkOmNc6v7OEyaYVVIa6Sv4A/AgVM+wz147I5bRZEbS74yKOCI5qZRvBPiwWe60BzPA23jIRrCRiPj2oAj/VJbo9BQcCAAE0AAAAAGBNFgAAAAAAUgAAAAAAAAAG3fbh12Whk9nL4UbO63msHLSF7V9bN5E6jPWFfv8AqQ0CAQxDAABJoqGMcf65O3NEpbO1N1KtXD4lhFoqGnZiSZKXxKSY9QFJoqGMcf65O3NEpbO1N1KtXD4lhFoqGnZiSZKXxKSY9QkHAAMIAQcNDAANAwEDAAkHAQAAAAAAAAALDgYFAgEEAAAADggKDQcMCQsCAAAAAAAAAA==",
    "mint": "D3DWxFRj3LHXcTHFcN7DDXyxFNEJsdsadXsKDukmrfos5H9R"
  }
}
Now, this encoded_transaction received in the response needs to the signed by the user wallet in order to create the NFT. Checkout our tutorial on how to sign transactions on solana here.
Once successfully signed, the token amount will be deducted from the user wallet and the membership NFT will be created in their wallet. We can now verify this NFT and maintain the user’s subscription details in the session data in order to provide additional features such as discounts to the users.
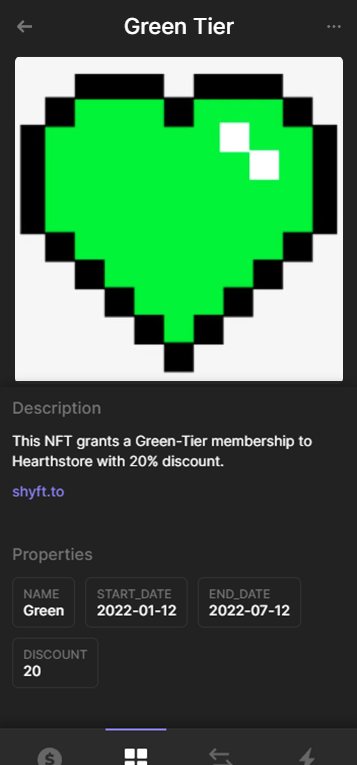
The newly minted subscription NFT
So, that’s pretty much everything on how we can provide a new membership to a store user. In the next tutorial, we will see how we can update an existing membership using SHYFT APIs. Stay tuned!